Remote Control
User Manual
Section titled “User Manual”Boxing Controller:Boxing key description Motion Control Version > 8.6.0.0,G1 Remote control button sticker download: 29dofRemote control key description、 23dofRemote control key description
Motion Control Version >= 8.5.0.0,G1 29-Dof Remote control button sticker download:Remote control key description
Motion Control Version >= 8.4.2.222,G1 29-Dof Remote control button sticker download:Remote control key description
Motion Control Version >= 8.4.2.222,G1 23-Dof Remote control button sticker download:Remote control key description
Motion Control Version >= 8.2.0.0,Remote control button sticker download:Remote control key description
Motion Control Version < 8.2.0.0,Remote control button sticker download:Remote control key description
Combat Version, Remote control button sticker download: Remoite control key decription
Concept description
Section titled “Concept description”| Concept | Description |
|---|---|
| Zero Torque Mode | All motors of the robot stop active motion, and there is no damping feeling when swinging. |
| Damping Mode | All motors of the robot stop active motion, and there is a clear damping feeling when swinging, which can enter the ready mode. |
| Ready Mode | The robot will slowly swing out the preparatory posture before the motion mode within 5 seconds. |
| Squat mode | The robot will slowly enter a squat position within 5 seconds (no balance control) |
| Seating mode | The robot will slowly assume a seated position within 5 seconds (no balance control) |
| Motion Mode | A mode in which the robot can be controlled to move by a remote control. |
| Continuous Walking Mode | The robot is always in a stepping state. |
| Standing Mode | In this mode, when the joystick instruction is zero, the robot stops stepping and enters the standing state; when the joystick instruction is not zero, or the robot is disturbed and difficult to maintain balance, the robot will start to take steps. |
| Debug Mode | For low-level development:When using the SDK for development or debugging, always verify that G1 is in debug mode (damping or zero-torque). Enter debug mode by pressing L2 + R2 on the remote); this halts the motion-control program and prevents potential command conflicts. To confirm debug mode is active, press L2 + A. In an emergency during debugging, press L2 + B on the remote to switch the device to damping mode. |
The robot’s current walking mode does not include the function for climbing stairs. Please avoid having the robot climb stairs at will to prevent damage to the robot.
Motion Control States & LED Strip Color
Section titled “Motion Control States & LED Strip Color”| Motion Mode | LED Strip Color |
|---|---|
| Normal Operation | Solid Blue |
| Damping Mode | Solid Orange |
| Seated Mode | Solid Green |
| Debug Mode | Solid Yellow |
| Zero-Torque Mode | Solid Purple |
| Standby Mode | Solid Dark Blue |
| Error State | Solid Red |
Mode switch
Section titled “Mode switch”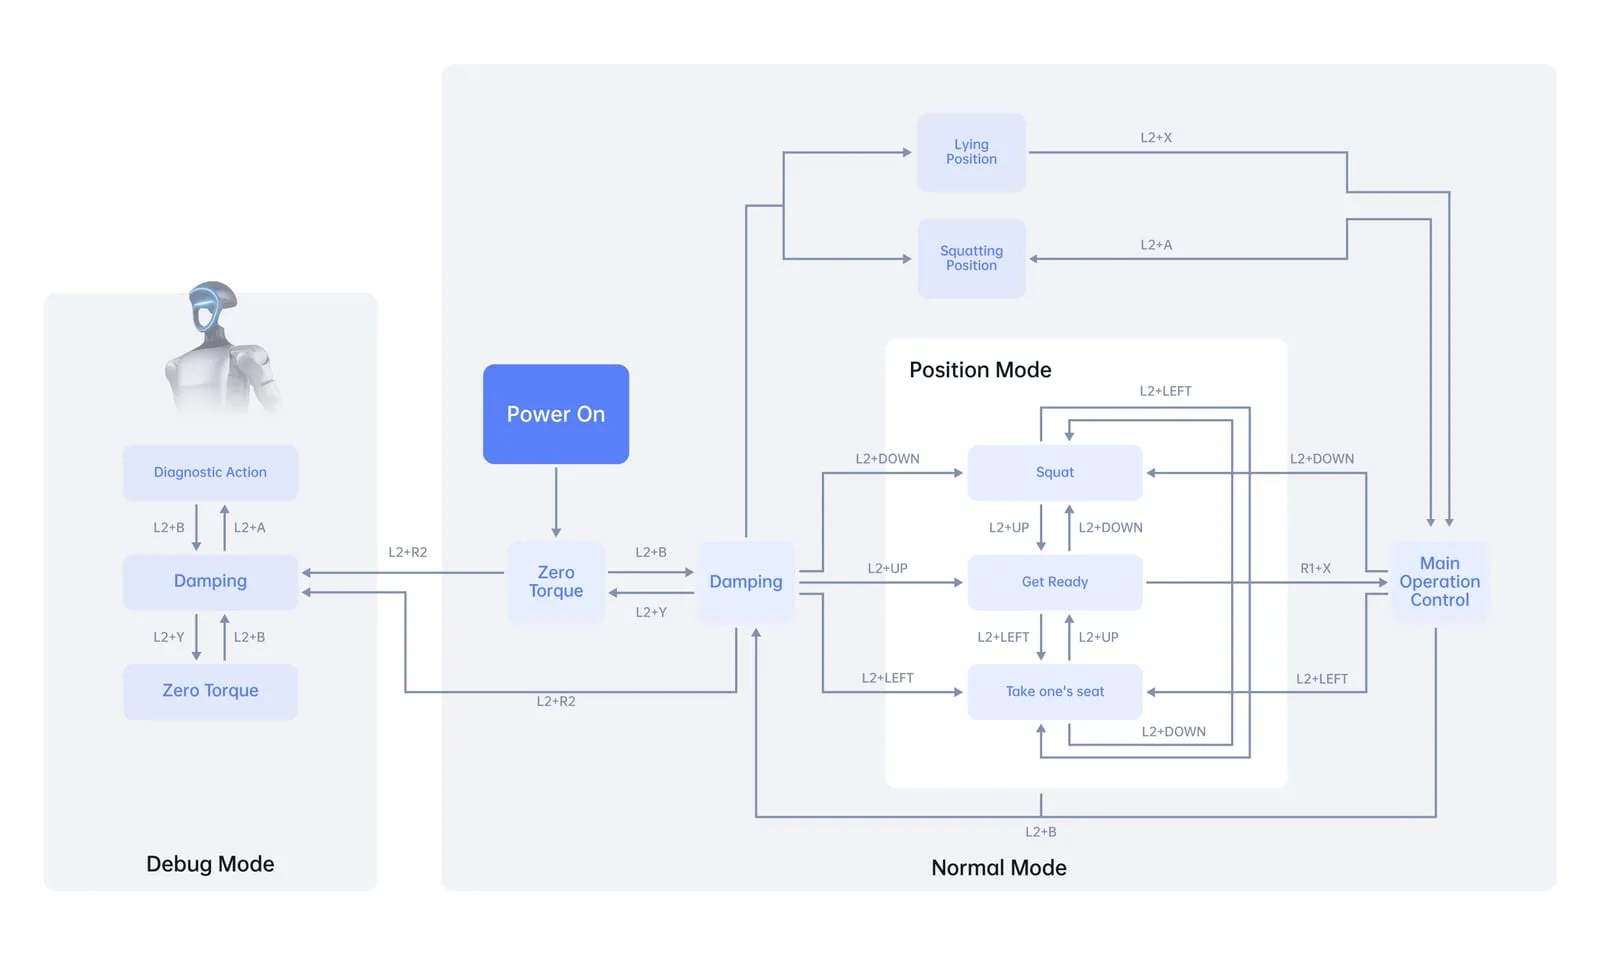
Key Description
Section titled “Key Description”| Mode switch | Button |
|---|---|
| Debug mode | Hold L2 + Click R2 |
| Zero torque mode | Hold L2 + Click Y |
| Damping mode | ① Hold L2 + Click B |
| Lock stand | ② Hold L2 + Click UP |
| Seated mode | ④ Hold L2 + Click LEFT |
| Lying and standing | ⑤ Hold L2 + Click X |
| Squat switch | ⑥ Hold L2 + Click A |
| Interactive function | Button |
|---|---|
| Wave Hand | Hold SELECT + Click Y |
| Handshake | Hold SELECT + Click A |
| Turn around and waves hand | Hold SELECT + Click X |
| ③ R2 + A(Run Control) | Button |
|---|---|
| Slow Running | R2 + DOWN |
| Fast Running | R2 + UP |
| Forward Lean | Hold START + Hold UP |
| Backward Lean | Hold START + Hold DOWN |
| ⑦ R1 + X (Main Opertain Control) | Button |
|---|---|
| Keep stepping (not recommended) | Double-click START |
| Standing | Double-click START |
| Low speed mode | Double-click L2 |
| High speed mode | Double-click L1 |
| Offset Compensation | Left Offset: Hold R1+ Click → Right Offset: Hold R1+ Click ← Forward Offset: Hold R1+ Click ↓ Backward Offset: Hold R1+ Click ↑ |
| ⑧ R1 + Y (Only Used For 3-DOF Waist Structure) | Button |
|---|---|
| Keep stepping (not recommended) | Double-click START |
| Stand | Double-click START |
| Low speed mode | Double Click L2 |
| High speed mode | Double Click L1 |
| Offset Compensation | Left Offset: Hold R1+ Click → Right Offset: Hold R1+ Click ← Forward Offset: Hold R1+ Click ↓ Backward Offset: Hold R1+ Click ↑ |
- ⑧ Only Used For 3-DOF Waist structure, recommended to use R1 + Y mode
- regular boot process: boot->①->②->③->demo->④(chair seat)-> turn it off
- lying boot process: (make sure that the boot device crotch post with the ground flat)->①->⑤->demo->⑥-> turn it off
- Squatting boot process: Boot (squatting)->①->⑥->Demo->⑥-> turn it off
- Switch on and off the machine using the protective rack, please refer to quick_start